Building the Wings ...
Cut out all the wing ribs, very easy with 99% of it already laser cut, still took 1.5 hrs though! (106 parts so far) numbering them all now to make it simpler to find the right piece! will start cutting the rest out later today (fuslage) and numbering that ! just waiting on the 8' x 4' x 2" board to be delivered to I can start the build in earnest.
")
")
")
")
All so far want a little sanding not a great deal, so that shouldn't take me too long (I think)
Will add the fuselage pics to here when cut out, and numbered!
Still not decided which way to go as the 'type' still heading for ED702 at the moment. I dont have to make final decision until I start building the fuselage! problem I've got is my G'Uncle flew both Dams Lancaster and Mk III's so the choice I have is AJ-Y ED924 (617 Sqd) or EA-D ED702 (49 Sqd) Must be honest I'm leaning more towards ED702
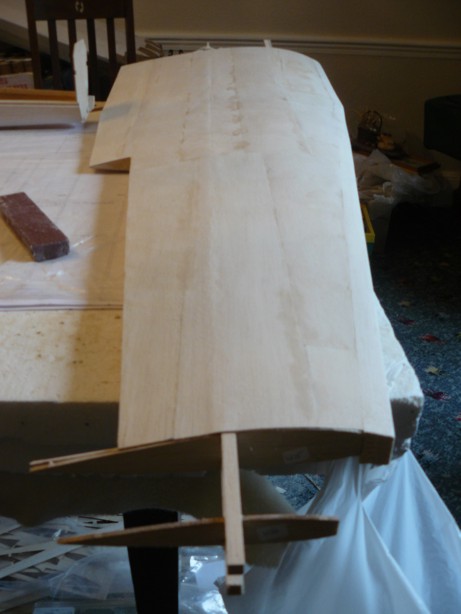
Dont have the room to work on both wings at the same time the plan sheet is 8ft long by 3ft wide! this one sheet on the board has taken over the table completely with just enough room to get all round to work on any part. Part 2 of the wing, ribs 4, 7 & 8 needed 7 degree angle bit of maths (aint had to do that for a number of years!!) for the dihedral and the engine nacelles. all going together far quicker than i first thought!!! but loads to do yet so the build time stays as i first considered 6 - 12 months...
")
")
2nd section of wing 2, having to get some more bits i forgot so wont be starting the tail wing section yet, will move onto the engine nacelles or the fuselage, have ordered the servo's even though I have some i've decided to get new, will let the wings have a couple of days to dry fully before continuing.
")
")
")
With waiting on parts I've decided to leave the fuselage as is for now, I'll get back to that when i can get all the bits I'm still needing. Got back to the wings today put the two halves together took a little time to make sue i had the dihedral degree angle correct,
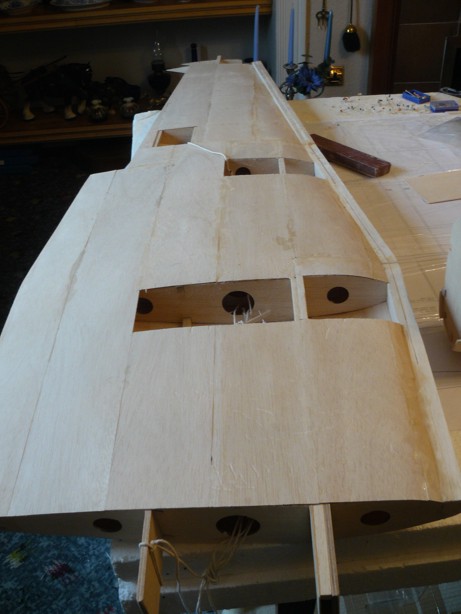
Dry fitted the engine nacelles together and tested against the wing these will be glued tomorrow. Fitted the mounting block for the wing servo
")
")
")
")
")
Just about finished covering the first wing, I have left the wing tip at the moment while i decide on if i will put LED's in the tip for the wing tip lights, seeing how hard it is to make the 'glass' covering first!
Completed the first sanding will now seal with dope then sand again!.. find any holes etc to fill in.
")
")
Finally got the wings just about finished, have decided not to put lights in the wing tips, feeding the cables required through etc weight ... so now just the tips to complete. Some reason the second wing took twice as long getting it covered for some reason was a fight in its self and 4 hours sanding on each wing... i dont want to see anymore sandpaper for some time .... Aleirons to make next and fit.
Finally got the wings completed .. apart from the ailerons!! but they wont take long to put together, somereason the 2nd wing took far longer to cover and get the wingtip right.. 3rd try before i was happy! have applied a coat of dope to one of the wings (hence colour diff) will do the 2nd one next week ...(raining at the moment!!) when i can get outside!
")
")
")
Test fitting to see how they look, each wing stands just over 5 foot (153 cm)
")
")
Built the ailerons these will be fitted after the wings have been doped.
")
")
")
Building the Tail ...
Started on the tail wing. Only to find out I would also have to work on the tail section of the fuslage .. as one fits into the other. And willl have to shape a section that the tail bolts to for a snug fitting...
")
")
")
")
Have partly skinned the tail section.. having to fit the wire rod (2 mm piano wire) for the rudder control .Bent the wire for the rudder's just need to add the support for the servo and finish the skinning **Note for any one else building this or similar ... bend the wire before building the section .. place the ribs on the wire then commence building!! damm hard bending wire in place and not damage what you have built so far!!! *. will fit the servo shortly, finish skinning .. then sand to shape. Working on the tail gunners section at same time for fitting the tail wing... underside showing the wire for the rudder fins
")
")
")
")
Working on the tail gunners section at same time for fitting the tail wing...
")
")
")
")
Finshed covering the tail section and started on the rudder fins.. I can now say this model has my blood & sweet .. no tears yet! after the knife decided to try and cut my finger off !! The middle left uncoveredd so bolts can be tightend and servos accessed ... the tail section can be removed for easy storage (if that is possible with this size of model ).
")
")
")
")
")
")
Tail Fins made from 12 mm sheet balsa with 12 mm hard wood balsa leading edge. Final outline shape completed just to complete the sanding thinning each down!... (loads of sanding on this build!!!) then connect together with hinges
Made a start on the elvevators today, managed to get them completed, will finish fitting the hinges tomorrow, and add the tail fins, this will them get a first coat of aircraft dope, ready for primer.
")
")
")
")
Hand drilled the holes for the doweling glued the doweling into the tail wing (after dry fitting of course) used epoxy to glue the fins into place Also using epoxy fitted the hinges onto the elevators, need to drill and pin all the hinges into place next!
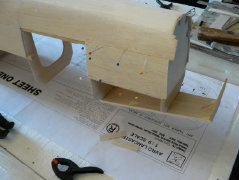
Back to work on the fuselage, beginning to build the bomb bay section, also removed the tail section makes it a little simpler to work with, on the original plan the fuselage was 1 piece, but at nearly 8ft would be a little difficult to fit in my car! So I decided to take the tail off!! This will be fixed back in place by 4 bolts .. the tail wing by a further 2 (Tail wing fixing is part of the original design).
")
")
")
Before finally gluing the supports in place .. a test fitting
Working on the fittings for the tail wing to fit to the fuselage so had to put the tail section back onto the main body section...
")
")
Turrets & Nose Section ...
Had to build nose section up for the front gunner and bomb aimers blister 3 times!!! working from the plans found they are 3mm out from the bilster pack you get the bombaimers blister 3mm larger than drawings think i've finally got it about right bit of shaping to do and remove the center this was the simplest way of getting around the problem, just hope that 3mm does'nt spoil the overall finish!
")
")
")
")
")
")
")
")
Ian Collis a Master Modeller accepted my challenged to make the front turret and Bomb aimers position for me, I knew his detail and light weight would work well with the model, his workmanship is 2nd to none, more of Ian's model building skills can be seen in the Bf110 build of Heinz Grimm's aircraft, he made for me, Ian is also on Facebook more of his work can be seen here Ian Collis Passionate Model Maker
")
")
")
")
")
")
")
")
Rear Turret ...
Working on the tail gunners section at same time for fitting the tail wing...
")
")
")

Still a lot of shaping to do! and then the fittings for the 303's
With that Thanks to Larry of Lancaster Archive and some great pictures he took of the rear turret started making the mounting for the 303's this is a draft version… of the left hand half.... will make in either 1.5mm ply or plasti-card...
")
")
")
")
Only area that i have had a long haul has been the 303's two firms in the states have folded after accepting my order (was begining to think i was jinxed ) no funds had changed hands so was lucky there, had several say yea no problem only a couple weeks later sorry cant do that scale!
this is the plans design on the guns & fitting for the lanc I was not happy with it knowing it will be on display at times i wanted them to look a little more realistic, finding Jamie in Arizona was a blessimg took 8 months! see Browning 303's for the guns lower down the page
")
")
")
")
")
")
")
")
")
Mid Upper Turret .....
still some work to do made the hole for the turret to fit.... this took some time had to make sure in right postition, I did'nt fancy re-skinning the top section again!
bottom half is made from a plastic container (cream in this case!) beginnings of the gun mounts ... and the two "operating levers " made from a couple of the modelling pins!
")
")
")
")
")
")
")
")